5 Steps to Start Your Teachers Pay Teachers Store
Sep 13, 2024
Have you ever thought about opening your own Teachers Pay Teachers store? If yes, let’s get you started on your Teachers Pay Teachers journey! If you are still on the fence, keep reading and let me show you how easy it really is!
I started my Teachers Pay Teachers Store in April 2020. This quickly became my “pandemic hobby”. Making resources kept me sane and busy during this crazy time. When I opened my Teachers Pay Teachers store, my goal was to keep myself busy and help teachers. Getting paid to do so was just a bonus.
As the year went on and my TPT store grew with more resources, I started hearing more and more “cha-ching” noices from the TPT app – which I highly recommend you get after you have posted some resources! I really did not anticipate making more than a few dollars here and there. I was amazed when I soon hit $100 in one day. My excitement grew when I hit my first thousand. Soon I was making 4-figures a month. Allowing me to be able to pay off my mortgage each month and have some left over to go on vacations and other fun activities. I cannot believe how far I have come in such a short amount of time.
I still make resources to sell in my Teachers Pay Teachers store, but now my focus has shifted to helping teachers like you, who are ready to open their own Teachers Pay Teachers store and make some extra money. Let’s get your TPT journey started!
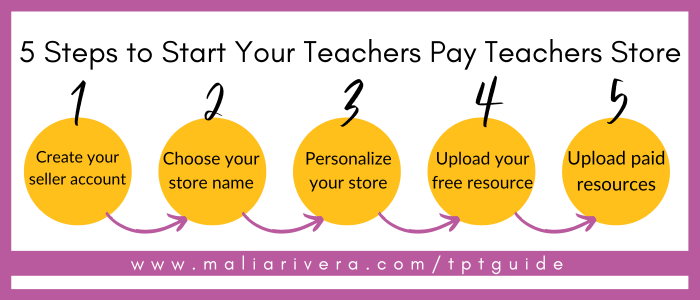
You can start your own Teachers Pay Teacher Store in just 5 easy steps. Here they are:
- Create a seller account
- Choose a name for your store
- Personalize your storefront
- Upload your first free resource
- Upload a paid resource
Step 1: Create Your Seller Account
If you don’t have a Teachers Pay Teachers account, don’t worry, all you need is an email and bank account to sign up. If you currently have a buyer account on Teachers Pay Teachers, you will want to switch it to a seller account. The seller account allows you to buy and sell resources.
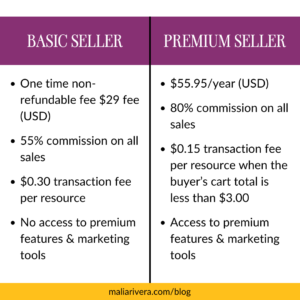
There are two options to a seller account: basic or premium. Myself, along with many other TPT authors, would highly suggest getting the premium seller account. This account costs $59.99 annually. It may seem like a big investment, but trust me, it will be worth! Check out this comparison between the basic and premium seller accounts
Step 2: Choose Your Store Name
Picking a name for my Teachers Pay Teachers was probably the longest process. I was very indecisive! If you aren’t sure of what to name your store, here are some thing to consider.
- Using your real name
- Using the grades and subjects you teach
- Use the same name for social media
If you already have a social media account related to teaching (not your personal one), keep your name! Especially if you have a solid following on Instagram or Facebook. You want to keep your store name consistent with your social media accounts.
Step 3: Personalize Your Store
Now comes the fun part – making your store, YOUR store!
I recommend using Microsoft PowerPoint or Canva to create your logo and banner for your Teachers Pay Teachers store. When coming up with a logo and banner, you want to be consistent with your colors and definitely use photos of yourself. When you include pictures of you in your logo and/or banner, it makes your brand more personable. People are more likely to trust you and your products because they can put a name to a face.
Here are the items that you can create to personalize your Teachers Pay Teachers store and their dimensions:
- Logo – 500 x 500 pixels – remember that it will be cropped to be circular
- Banner -- 1200 x 320 pixels -- you can double or triple the size if you need to!
- Grab the Free TPT Banner template (for the 2024 banner size)
Step 4: Upload Your Primary Free Resource
Your very first product that you upload to Teachers Pay Teachers must be free, per Teachers Pay Teachers guidelines. This free resource is going to showcase the quality of the products in your store. It can be changed later so don’t stress about it being the perfect representation of your store. Here is what you are going to want to include in your primary free resource, put them in whatever order makes the most sense for you and your customer:
- High quality resource
- An answer key (if applicable)
- Terms of Use page
- Credits Page
Step 5: Start Uploading Paid Resources
Your store is almost complete! It is time to start uploading those paid resources. You can upload resources in a few different ways: PDFs, Google Drive files, or Videos (premium seller accounts only). There is a list of items that you need to fill out when uploading each resource, paid or free. All items are important to making sure the buyers know exactly what is in the resource. The more the buyer understands about your resource, the more likely they are to make a purchase.
- Title with keywords
- Your resource file
- Preview file
- Video preview (optional, but highly recommended!)
- Cover photo
- Thumbnails
- Description
- Price
- Tax code
- Tag grades
- Select the subject area, resource type, and custom categories
- Tag standards
- Include optional details
- Select the correct copyright statement
Now make it active and keep adding more high quality resources!
Do You Want a FREE List of Words & Phrases to Add to Your TPT Listings That Will Make Them Stand Out?
Join my email list and I'll send you my free Big List of Powerful Keywords and Phrases that teachers are ACTUALLY searching for. You can add these to titles, descriptions, thumbnails & more!
We hate SPAM & promise to never send it. Your contact information is safe and never shared.
TPT for Beginners Coach

